Do you have a piece of furniture that could use an update?
Using the acrylic-pour technique you can transform any flat surface into a work of art. You just need:
- to know the proper way to prepare the table for painting
- the right ingredients
- some imagination
- and a place to get messy
and I GUARANTEE, you will love the results.

I recorded the video below while doing this LIVE in segments on Instagram (that's why the weird orientation). The girls in my design camps had complained that you couldn't trust Pinterest and YouTube videos because they left out the parts where they messed up. Our girls are perceptive! So I committed to doing a whole series of projects Live.
I had just learned this technique for art canvases when I attempted it on furniture. It turned out even better than I imagined.
Supplies:
- Good Quality primer (I use Grip-N-Seal by Coronado) and paintbrush for application
- Painters tape
- Lightweight plastic for masking legs
- Latex gloves
- Heavy-duty drop cloth (with plastic under it if working inside)
- Flo-troel paint conditioner (Available at Amazon or any Big Box Home store)
- Small clear plastic cups. You can number them with a Sharpie if you like. It is helpful if you are working with little ones, but it's not necessary.
- Assorted craft paints
- Stir sticks (wooden popsicle sticks work great. You can use anything because the mixture is nontoxic and water washable, just be advised that heavy things like silverware will tip your cups over when you sit them down)
- Large cup for layering all the colors
- Furniture paint for the rest of the table (I recommend Benjamin Moore RustCat in Semi-gloss or Gloss or Benjamin Moore Advance-any finish, depending on how shiny you want it)
- Good quality paintbrush for applying furniture paint
____________________________________________________________________________________________________________________________________________________
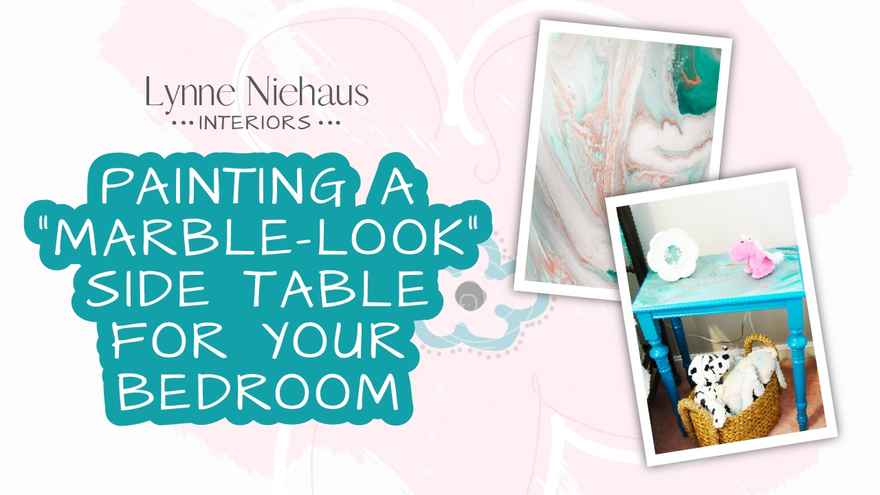
Design Note:
If I am creating a bedside table like in the video, I choose the colors based on the colors that I want to use in the room and decide whether I want it to stand out or whether I want to make the room feel larger. If I want it to pop and we have soft neutral wall color, I use a bright version of the color that is used throughout the room. If the walls are the principal color in the room and I want it to pop, I use the complementary color (the color opposite the wall color on a color wheel). If I am creating this piece of furniture with the intent of making the room feel larger than it really is, I paint the base of the table in a color similar to the wall color and use that and other colors being used in the room in the tabletop.
In a small room, I like every piece of furniture to be intentional and play a role in the design.
That's why this is such a great project. Because you can bring together several different design elements just by incorporating those colors in the marbleized top.
While it is tempting to want to combine lots of colors, this project looks best with 4-5 colors, with one of the colors being white. I find that having one color be a metallic paint (gold, silver, rose gold or copper) gives a great illusion of sparkle and depth. I use the base color that I am painting the table as one of the colors unless the base is being painted very light or neutral.
If you are nervous about how your colors work together, you can always do a mock run on a blank artist canvas from the craft store. (This can be repurposed as a great gift for the grandparents 😉 Although your daughter will probably want to hang on to it, hanging it on her wall or in her bathroom.)
_________________________________________________________________________________________________________________________________________________
The video above walks you through the entire process so that your project comes out great. But here is a quick overview of the steps:
1. Remove any hardware and clean your table very well. (cleaners and oils will keep the paint from sticking)
- Dust with a clean rag *** DO NOT USE FURNITURE POLISH!
- If the table is very old or has a lot of build-up you will want to use TSP like in the video. Isopropyl (rubbing) alcohol or a rag soaked in warm water with dish soap work well on most furniture. If using the soapy water rag, wipe down with plain water and dry very well before proceeding.
2. Apply Primer to all of the areas that you want to paint and let dry
3. If you are repainting the rest of the table, do that now.
- Leave the top of the table exposed with the primer. You want the pouring paint to have something good to grab to.
- Repeat with 2nd coat of furniture paint.
4. While you wait for the paint to dry, prepare your mixing cups:
- pour about 1/2 cup Floetrol in each of the small plastic cups for each color that you have selected for your project
- squirt or add about a teaspoon of paint into each cup (you can use wall or furniture paint straight from the can using a plastic spoon, just use a wee bit more. This project is SO forgiving. As long as you take the time to mix each color well and layer slowly and cover the surface entirely, you will get a stunning result---No Matter how artistic you consider yourself!)
- stir each cup very, very well. When you think it is good, stir a little more. Wipe the edges of the stirrer off on the side of the cup and stir a little bit more.
- The Flotroel is milky white but dries clear. If you want a white element to your design, you need to add white paint. Otherwise, it will dry clear and you will see the basecoat primer.
- Line your cups up in the order that you are going to layer them. Either darkest to lightest, or lightest to darkest.
5. Once the paint is dry, tape the masking plastic along the edges of the table. Try to keep your tape lines as straight as possible. You want the paint to run off the edge in every direction and run down the plastic. **If you are working with a pedestal table, you can tape just the pedestal. It's going to keep dripping longer than you expect it to!!!
6. Creating your pouring layers.
- Using your larger cup, pour about 2-3 tablespoons of the first color into the center bottom of the cup. (Avoid letting the paint touch or run down the sides)
- Pour approximately the same amount of the second paint color directly in the center of the first paint.
- Repeat with each color, always pouring slowly into the center of the paint in the larger cup, avoiding drips down the sides of the inside of the larger cup.
- Once you have worked through all of the colors, continue to cycle back through -in order- and repeat the layers until most of the paint has been used from each small cup.
- I like to leave about a tablespoon or so in each small cup in case I feel like I need more of a color in my overall design once I start pouring.
7. The fun part...
- Slowly pour the paint, like a winding river across the top of the table. Side-to-side snaking back and forth.
- Move the table around, tilting it in various directions to allow your poured lines to run together
- The paint will move slowly. Avoid rushing it or touching it to keep the various colors from mixing.
- If there are any bare areas, add more of the mix. ***DO NOT BRUSH IT!!!
- You can pour directly from the small cups if you feel like a color is missing in a spot. But don't try and control the pattern too much. It will look blotchy.
- The paint should be running over the edge in every direction across the entire surface. Check the corners, make sure the paint is running over the edge there too!
After about 6 hours, the paint has stopped migrating and you can remove the plastic (just don't touch your beautiful top!). And clean up.
Depending on how humid it is, it could take 24 hours or more to dry completely. But it won't drip. I like to move it away from curious fingers during the final drying. It looks like it is done before it is! I always pour the excess out of my large pouring cup and set that near the table and test to see when that is completely dry to the touch. A stir stick from one of the small cups works as a test as well but the wood does absorb the moisture a little faster than the primed surface of the table. So be careful!
Comments